Applying for a U.S. visa presents significant challenges, particularly during the completion of the DS-160 form. At VisaFast, we recognize the difficulties faced by travelers throughout this process. Consequently, we have developed this detailed guide to streamline each stage, ensuring accurate and straightforward completion of the form. By following this guide, applicants can efficiently navigate the DS-160 form, facilitating a smoother U.S. visa application.
Prior to commencing the DS-160 form, it’s crucial to acknowledge a 20-minute time limit for completion, following which your session will expire. Upon expiration, you must retrieve your application using the provided application ID.
The following outlines the key steps for completing the DS-160 form for a B1/B2 visa:
- Step 1: Collect all necessary documents and required information.
- Step 2: Initiate the application process.
- Step 3: Review all application details.
- Step 4: Input personal information section one.
- Step 5: Input personal information section two.
- Step 6: Provide travel details.
- Step 7: Enter information for any accompanying travel companions.
- Step 8: Report any prior U.S. travel history.
- Step 9: Supply address and contact telephone details.
- Step 10: Complete passport information.
- Step 11: Provide details for a U.S. point of contact.
- Step 12: Submit family information.
- Step 13: Provide data regarding employment, education, or training.
- Step 14: Detail previous employment, education, or training experiences.
- Step 15: Supplement with additional work or training specifics.
- Step 16: Address security and background questions – part 1.
- Step 17: Address security and background questions – part 2.
- Step 18: Address security and background questions – part 3.
- Step 19: Address security and background questions – part 4.
- Step 20: Address security and background questions – part 5.
- Step 21: Review, sign, and submit the completed application.
Step 1: Collect Necessary Documents and Data
Prior to completing the application, it is essential to assemble all requisite documentation. Although document uploads are not required, the information contained within these documents is crucial for accurately filling out the application.
Passport: Your passport must be valid for the entirety of your intended stay in the United States.
Travel Itinerary: Detail all planned destinations within the US. Retain your travel itinerary, as it necessitates specifics regarding your accommodation and intended locations of travel in the US.
Historical Travel Records: If you have prior US travel history, supply the corresponding travel dates.
US Contact Details: You will need to furnish details pertaining to your US contact person or hotel reservation information.
Travel Companion Information: Provide comprehensive personal information for your travel companion (e.g., family member, friend, or spouse).
Academic Credentials: Should you possess higher education qualifications, retain relevant certificates to accurately record details such as institution names, attendance periods, and degrees conferred.
Supplementary Information: Compile fundamental details concerning your familial circumstances, employment status, and medical background.
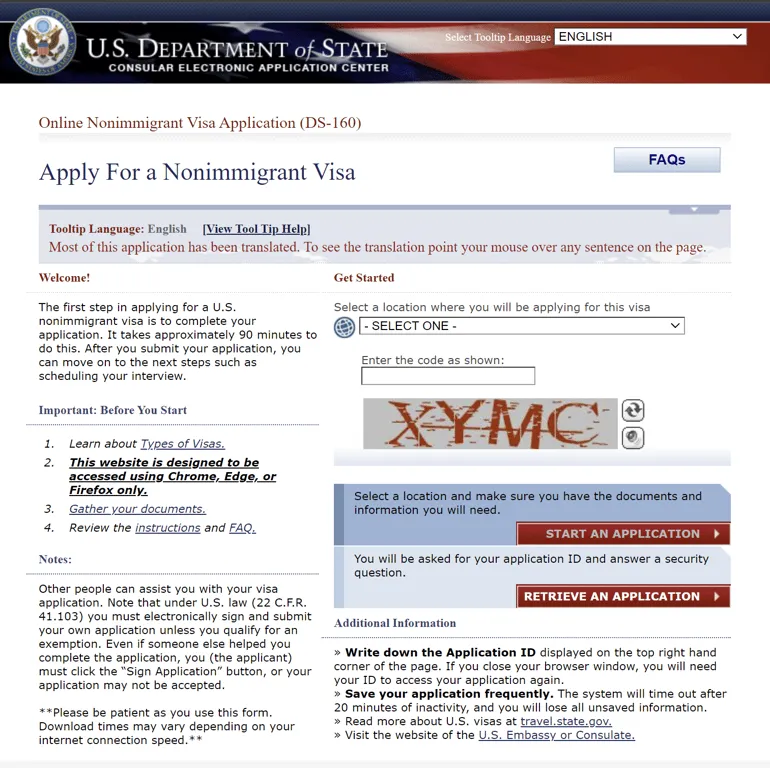
Step 2: Initiate the Application
Begin the DS-160 application process by accessing the Consular Electronic Application Center (CEAC) website:
- Application Location: Choose the country from which you will submit your application, complete the required captcha verification, and then click the “Start an Application” button.
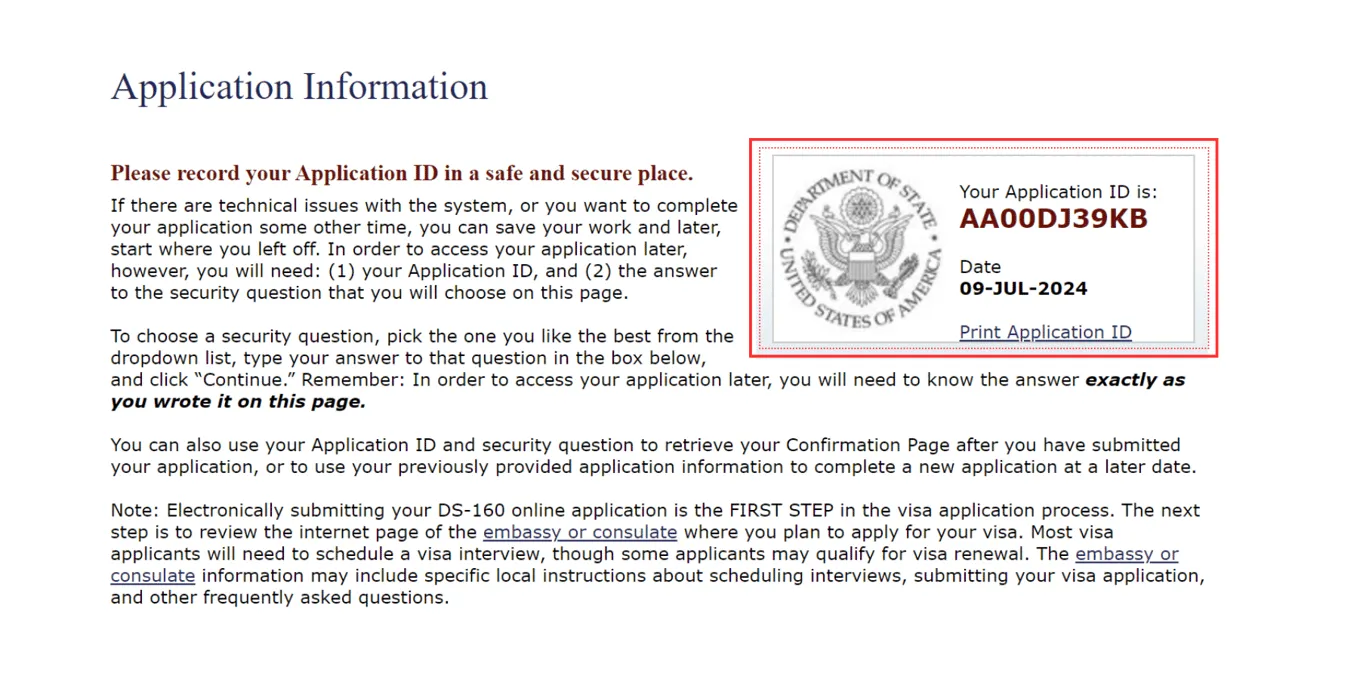
Step 3: Application information
Note down your application ID: Take a screenshot or note down your application ID. This ID is essential for retrieving your application, whether you were logged out due to the time limit or if you chose to save your progress and complete it later.
Security question: Choose a security question and provide an answer. The security question, your application ID, the first five letters of your name, and your birth year will be used to retrieve your progress.
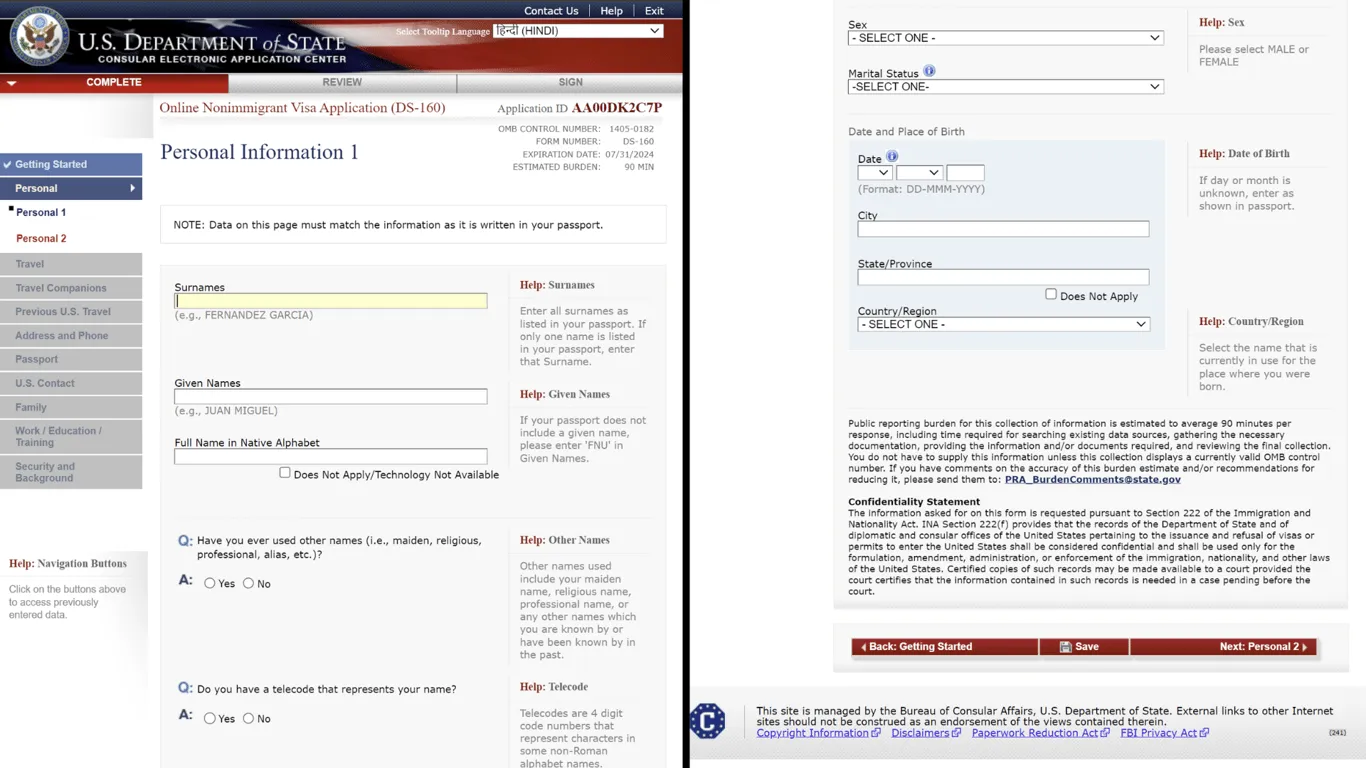
Step 4: Personal Information
- Surname: Please enter your last name precisely as it appears on your passport. Verify the spelling carefully to prevent discrepancies during the visa interview. If your passport contains multiple surnames, list all of them.
- Given Names: Provide all your given names (first name and middle name(s)) accurately, mirroring the information on your passport. As with your surname, ensure correct spelling.
- Full Name in Native Alphabet: For applicants whose names are recorded in a non-Roman script, supply your full name – including first, middle, and last names – using the native alphabet. This is crucial, particularly for individuals from nations where names are frequently translated into English, as consulates utilize this information for verification against local records.
- Other Names Used: List any alternative names you have utilized, such as a maiden name, religious name, or professional designation.
- Gender: Select your gender from the available options.
- Marital Status: Indicate your current marital status from the provided selections.
- Date of Birth: Enter your date of birth, adhering to the format specified on your passport.
- City of Birth: Provide the exact name of the city and province in which you were born. If the city has undergone a name change, use the designation as it appears on your passport.
- Country of Birth: Choose your country of birth from the provided dropdown menu.
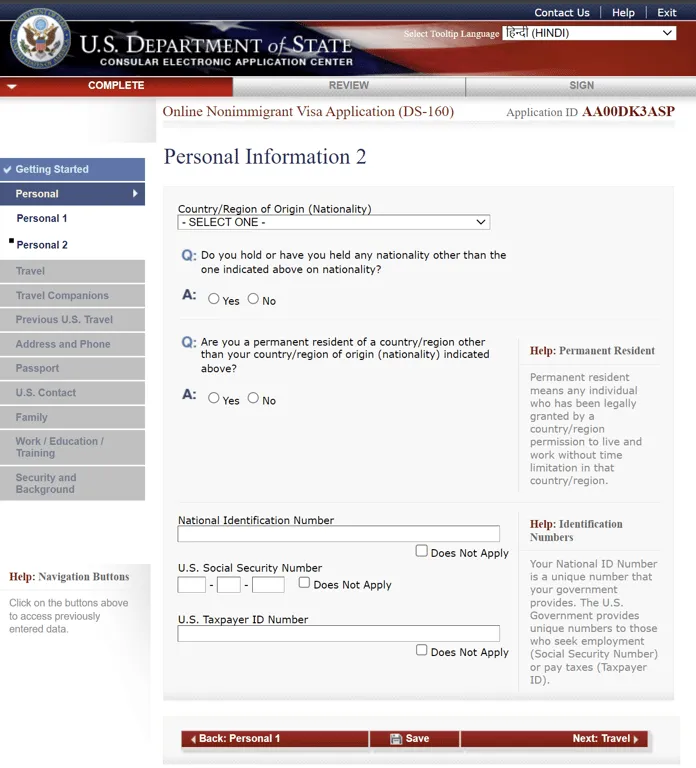
Step 5: Personal information 2
Nationality: Select your nationality from the drop-down list. Then, indicate if you have or held a nationality other than your country of birth. The consulate uses your nationality to understand your eligibility for the visa. If you have a nationality other than your country of birth, indicate this and choose the specific nationality.
National identification number: Enter your national identification number if your country of residence issues one. If applicable, also enter your US Social Security Number or US Taxpayer Identification Number. If you have none of these, select “Does Not Apply.”
Note: While filling DS 160, for Indians, please select “Does Not Apply” for national identification number.
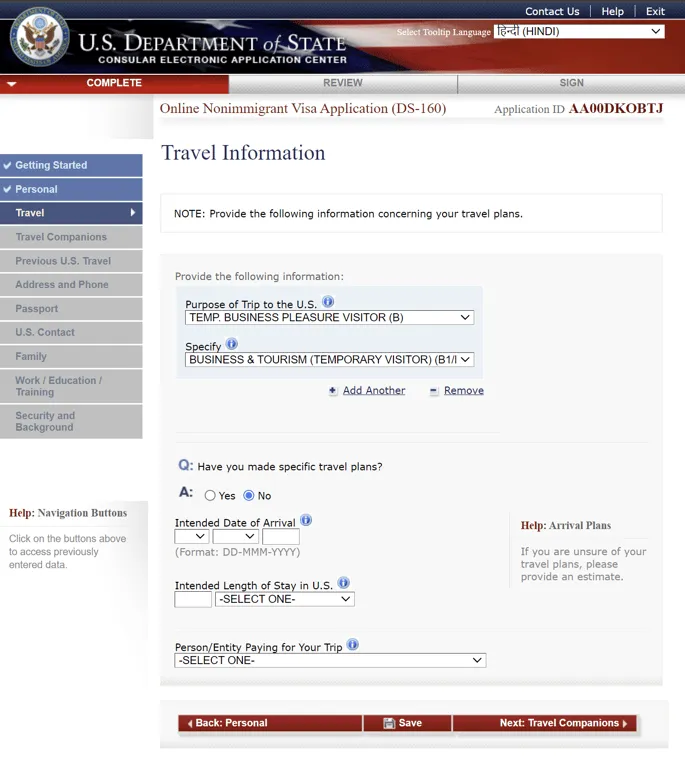
Step 6: Travel information
Visa type: Select your visa type. You can choose from some of the following travel purposes:
- Type B visa for short-term tourism or business.
- Type C for transit purposes.
- Type E for investors.
- Type F for students looking to study in the US.
- And more…
Specify your visit purpose: After selecting your visa type, use the drop-down list to specify your purpose for visiting, such as tourism, business, or family visits. It is vital to choose your purpose of travel accurately as it will determine what visa type you receive and the documents you need.
Intended arrival date: Enter the date you plan to arrive in the US. Make sure your arrival date matches your flight ticket details to ensure accuracy in all your documents.
Intended length of stay: Specify how long you intend to stay in the US. Provide the duration in days, weeks, months, or years. For example: “5 days” or “3 weeks.” Clearly state your length of stay, as authorities will closely examine any unrealistic durations. Make sure your stay matches your travel purpose to avoid raising any concerns.
Place of stay: Provide the address where you will stay during your visit, such as with a friend or at a hotel. Your accommodation strengthens your application as authorities use the address to verify your reservation.
Person/entity paying for your trip: Select who will pay for your trip, either yourself or a sponsor. Indicating who will cover your trip expenses is important for demonstrating financial stability or additional documents if you are sponsored.
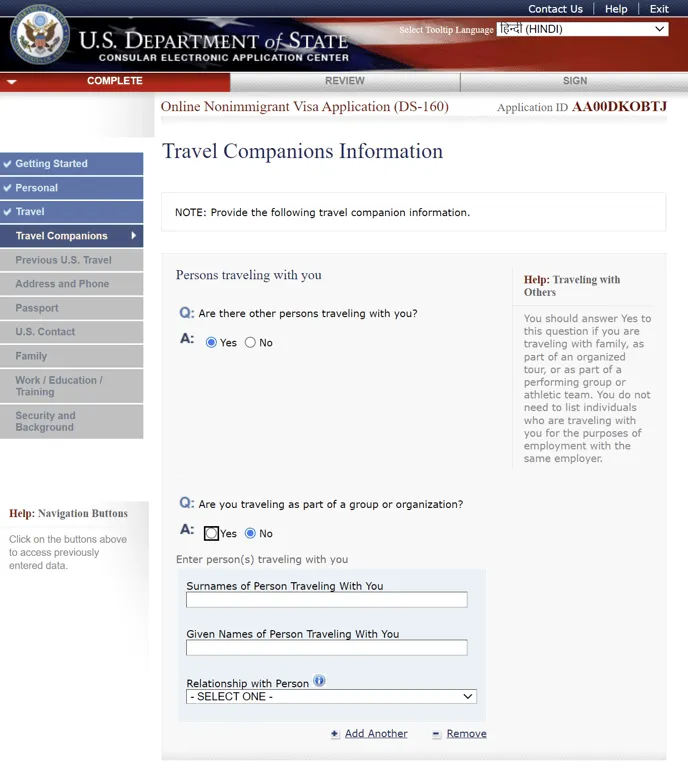
Step 7: Information for Travel Companions
- Travel Companions: You must supply the complete personal details for all individuals travelling with you. A “travel companion” encompasses anyone accompanying you, including friends, family members, or relatives.
- Group Travel: If your trip involves travel with a group or organization, please specify this and furnish relevant details. Disclosure of group travel, particularly when facilitated by a tour operator or associated with a specific event, may assist in the efficient processing of your visa application.
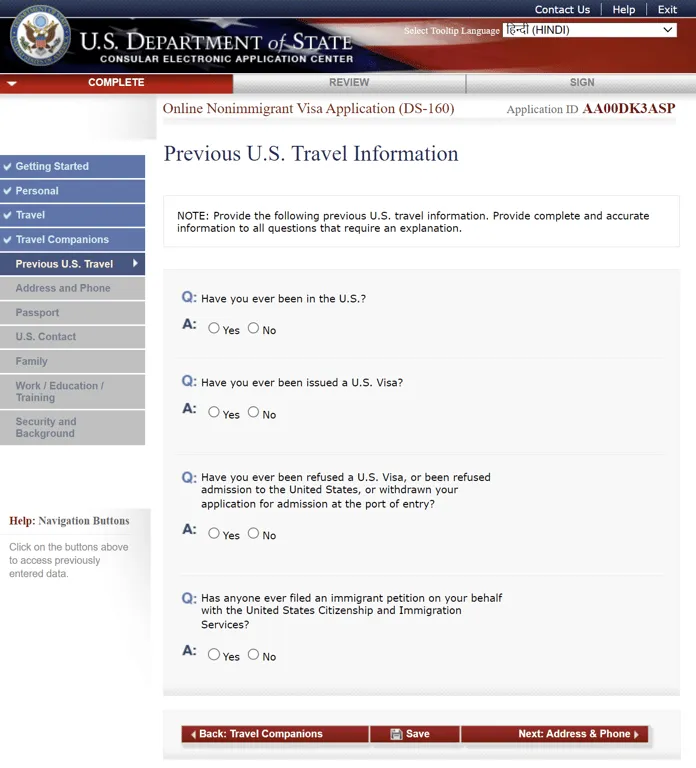
Step 8: Previous US travel information
Previous US travel: Answer yes or no to whether you have been to the US before. If yes, you must provide additional details, such as the date and length of your stay. Your previous travel history to the US can significantly affect your current visa application. A positive travel history, such as adhering to visa terms, can strengthen your application, while overstays or visa violations may raise red flags.
Previous US visas: Indicate if you have ever been issued a US visa, and if so, mention the visa type, your length of stay and other information regarding your previous visa. Being able to provide proof of previous US visas will positively affect your application.
Lost or stolen visas: Answer yes or no, depending on whether your passport has been lost or stolen before. Having lost your passport in the past will negatively affect your application. However, it is vital to mention this and explain the circumstances.
Previously refused visas: State whether you have been refused a visa or entry to the US. If you answer yes, explain the reasons. Previously refused visas can impact your application. Minor issues like missing documents are less concerning, but serious reasons like visa violations or blacklisting may require additional steps. Seeking professional help from visa services is advised in such cases.
Previous immigration petition: Mention if you have ever received an immigration petition on your behalf and explain the reasons for the petition. If you have a previous immigration petition, ensure to explain that it’s unrelated to your current visa application and clearly state the reasons behind the petition, as it can affect a non-immigrant visa application.
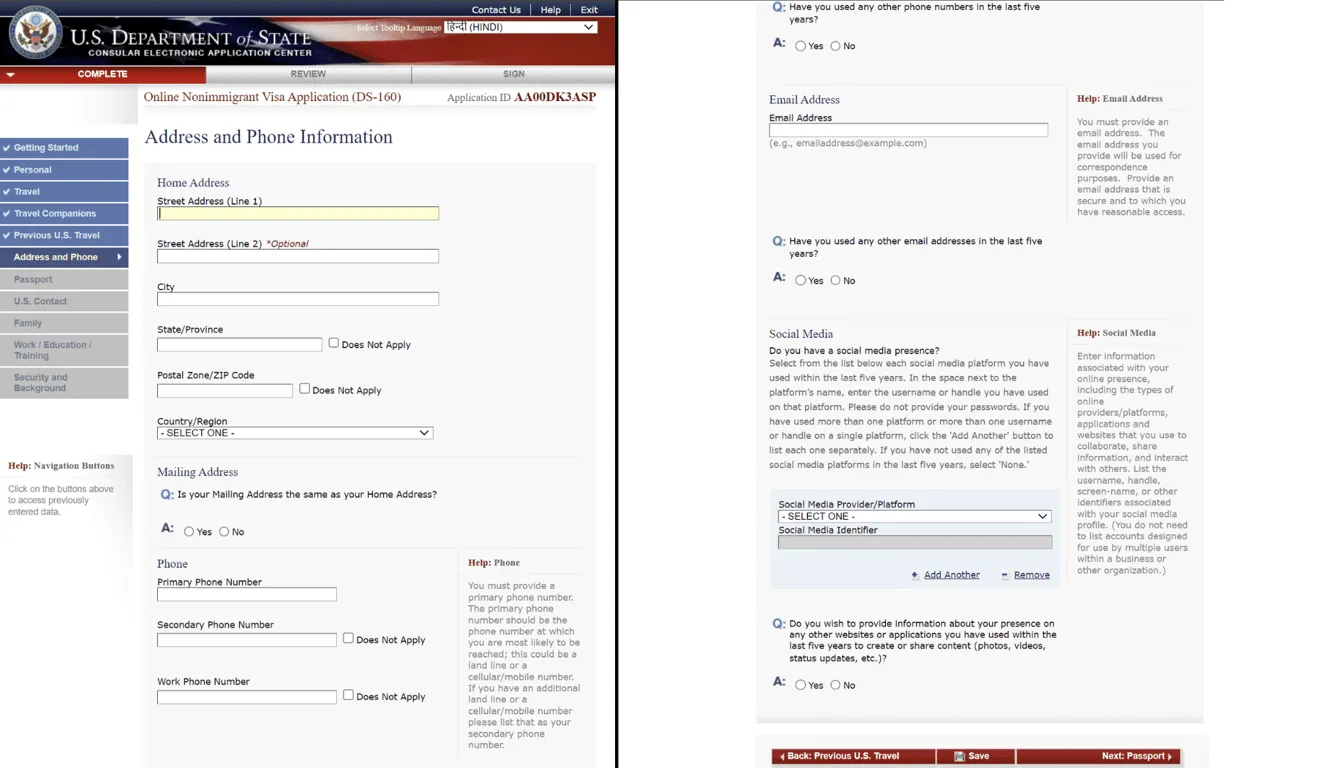
Step 9: Contact Details
Residential Address: Please provide your current residential address, including street name, city, province, and postal code. This information is utilized to verify your place of residence and may be cross-referenced with supporting documentation submitted as part of your application. Accuracy is crucial in this field.
Mailing Address: Indicate ‘yes’ if your Post Office Box (PO Box) address corresponds to your residential address. If it differs, please supply your mailing address. PO Boxes may be utilized for document delivery when required.
Phone Number: Enter your primary contact telephone number and clearly state any changes to this number within the past five years. Your phone number serves as a vital communication channel throughout the visa application process; ensure it is readily accessible for important updates.
Secondary Phone Number: Provide a secondary contact telephone number if available. A secondary number offers an alternative point of contact, enhancing accessibility.
Work Phone Number: You may optionally include your work telephone number. Providing your work phone number offers additional validation of your employment status.
Email Address: Enter your email address and select ‘yes’ if it has been altered within the last five years. Your email address is the principal means of communication during the application process; ensure you provide a contact address you routinely access.
Social Media Accounts: Select the social media platforms you regularly utilize and supply your respective usernames. Immigration authorities may review your online presence to confirm your identity and intended purpose of travel. Inclusion of your accounts strengthens your application through demonstrating transparency; however, avoid sharing highly personal accounts unless absolutely necessary.
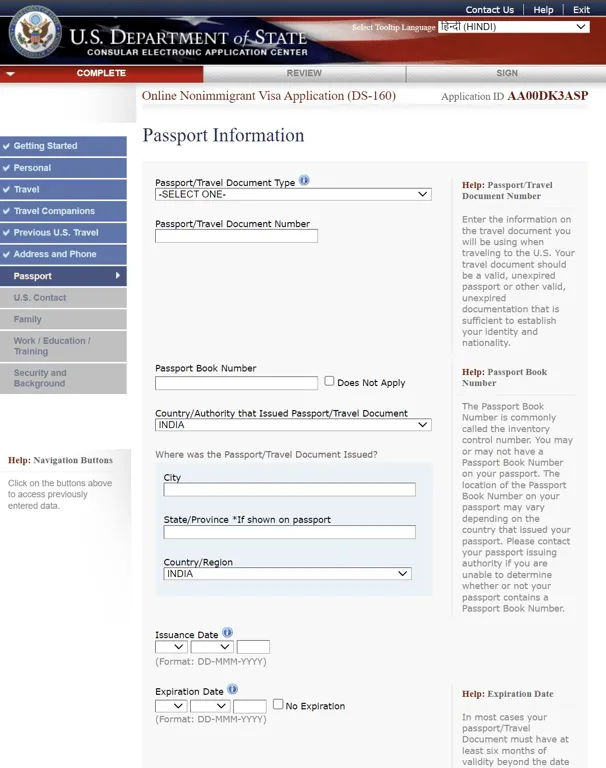
Step 10: Passport Details
- Passport Type: Select the type of your passport or travel document, including options such as standard, official, or diplomatic. Your chosen passport type will influence specific requirements outlined in your visa application.
- Document Number: Please enter the identification number assigned to your passport or travel document.
- Passport Book Serial Number: If available, provide the passport book serial number, also recognized as the ‘inventory control number.’ Note that not all passports include this specific number.
- Issuing Authority: Specify the country responsible for issuing your passport, representing the relevant government or issuing authority.
- Place of Issue: Detail the city, state/province, and country where your passport was originally issued.
- Issue Date: Record the date on which your passport was officially issued.
- Expiration Date: Enter the expiry date of your passport, confirming it extends beyond your intended departure date from the United States.
- Previous Lost/Stolen Passports: Indicate if you have previously lost or had a passport stolen, providing a detailed explanation of the circumstances. The consulate utilizes this information to verify the validity of your current passport and confirm the absence of any unresolved issues pertaining to previous passport records, maintaining the accuracy of your travel documentation.
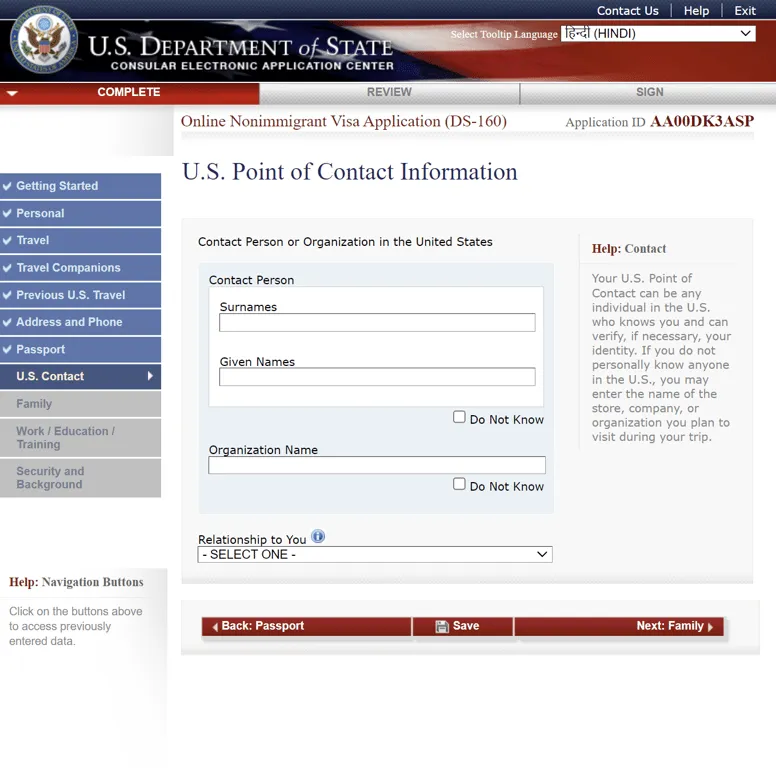
Step 11: U.S. Point of Contact Details
- Contact Person Name: Please provide the full name and current contact information for an individual residing in the United States who can confirm the purpose and duration of your visit. For tourism applications, you may utilize your hotel’s details if you do not have a personal contact within the U.S.
- Organization Name: For business-related visits, enter the details of the relevant corporate entity. Select “Do Not Know” if the contact person’s details have been previously provided, and vice versa.
- Relationship to You: Select the appropriate relationship between the contact person and yourself.
- Contact Address: Supply the physical address of the contact person or the accommodation where you will be residing.
- Phone Number: Enter the telephone number of the designated contact person or the hotel.
- Email Address: If available, include the contact person’s email address in the United States. This provides immigration authorities with an alternative communication channel.
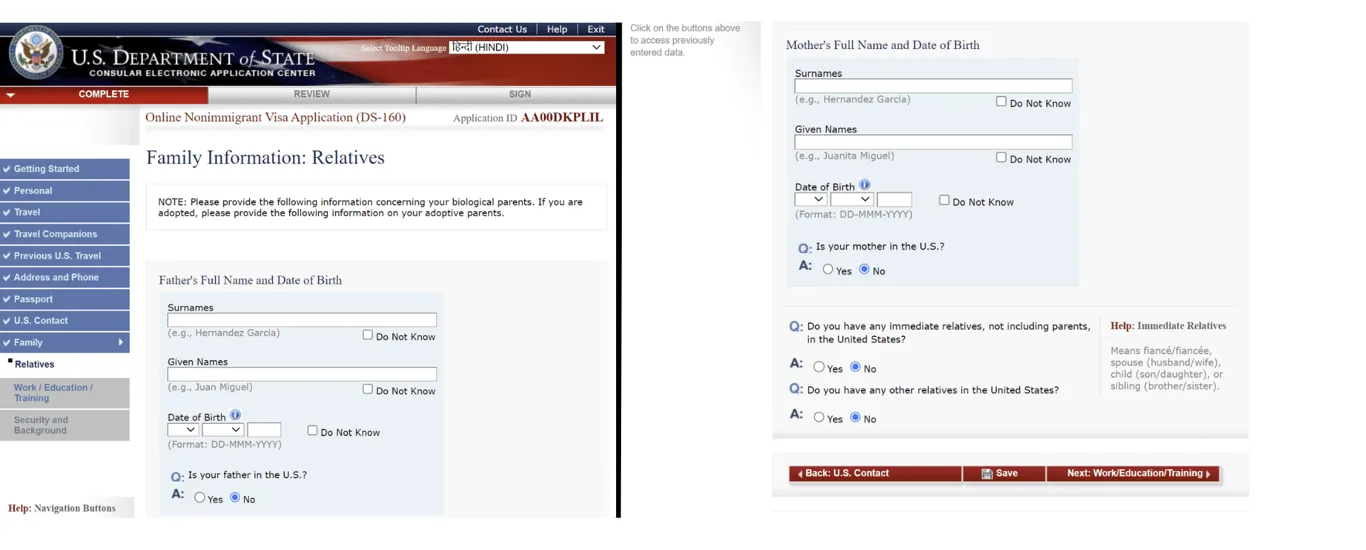
Step 12: Family Details
Father’s Last Name: Please input your father’s last name. Information regarding your father’s family lineage is required, which may be a factor in determining eligibility for US citizenship or residency applications.
Father’s First Name: Enter your father’s given first name, including any middle names.
Father’s Date of Birth: Record your father’s date of birth. Combined with your father’s name, this information assists in confirming his identity.
Father’s US Residency: Indicate whether your father currently resides within the United States by selecting “Yes” or “No”.
Mother’s Last Name: Input your mother’s last name. Details concerning your mother’s family background are necessary, particularly if related to potential US residency applications.
Mother’s First Name: Provide your mother’s given first name, including any middle names.
Mother’s Date of Birth: Record your mother’s date of birth. This information is utilized to verify your mother’s identity.
Mother’s US Residency: Indicate whether your mother currently resides within the United States by selecting “Yes” or “No”.
Relatives in the US: Provide details regarding any immediate family members residing in the United States.
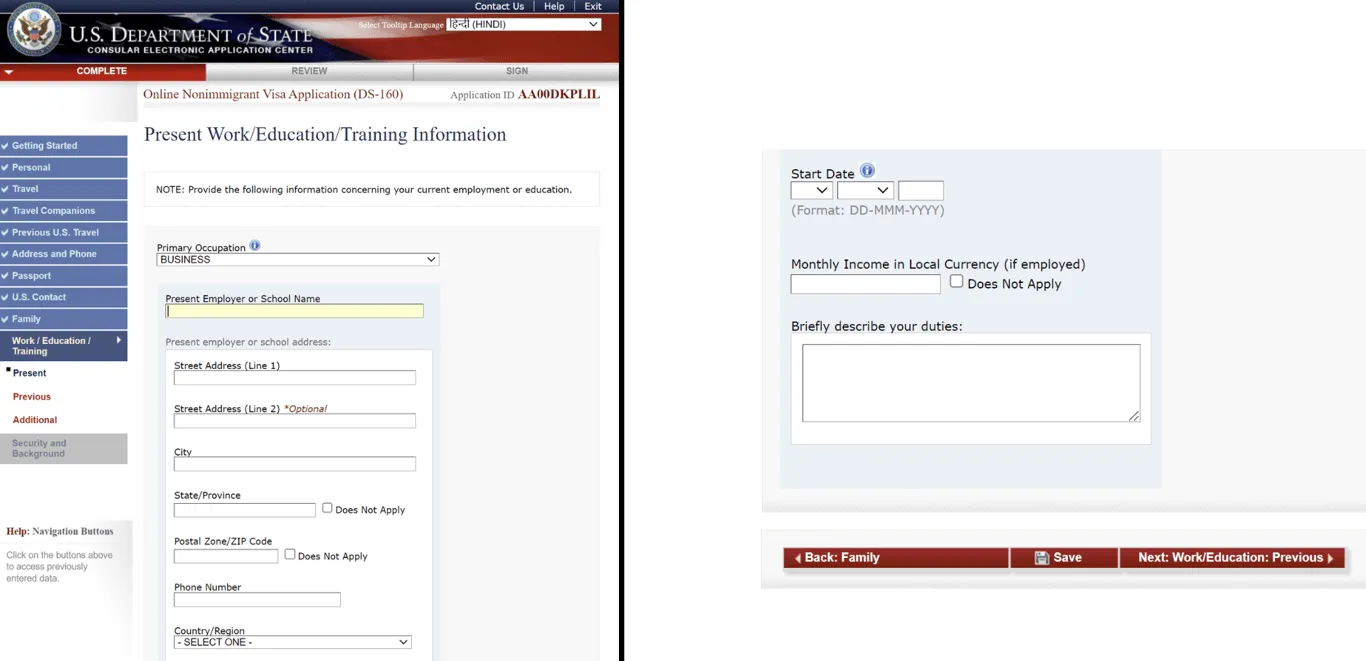
Step 13: Work/Education/Training Details
- Current Employment Status: Select your current employment status from the provided options, including employed, self-employed, student, or unemployed. This information is crucial for immigration authorities to assess your financial stability and determine your eligibility for the specific visa category.
- Employer/Educational Institution Name: Enter the full name of your employer or the educational institution you attend.
- Employer/Educational Institution Address: Provide the complete physical address of your employer or the educational institution. This address is utilized to validate the legitimacy of your employer or educational institution.
- Employer/Educational Institution Contact Number: Enter the contact telephone number for your employer or the educational institution.
- Date of Employment Commencement: Indicate the date on which you commenced your employment with the company.
- Monthly Income: Specify your gross monthly income in the local currency (if employed). Your monthly salary will be assessed alongside your bank statements to confirm sufficient funds and consistent income levels, as required for the visa application.
- Detailed Job Description: Provide a concise explanation of your role and responsibilities within the company. A detailed description of your duties offers valuable insights into your professional experience and expertise, particularly when applying for visas related to work authorization.
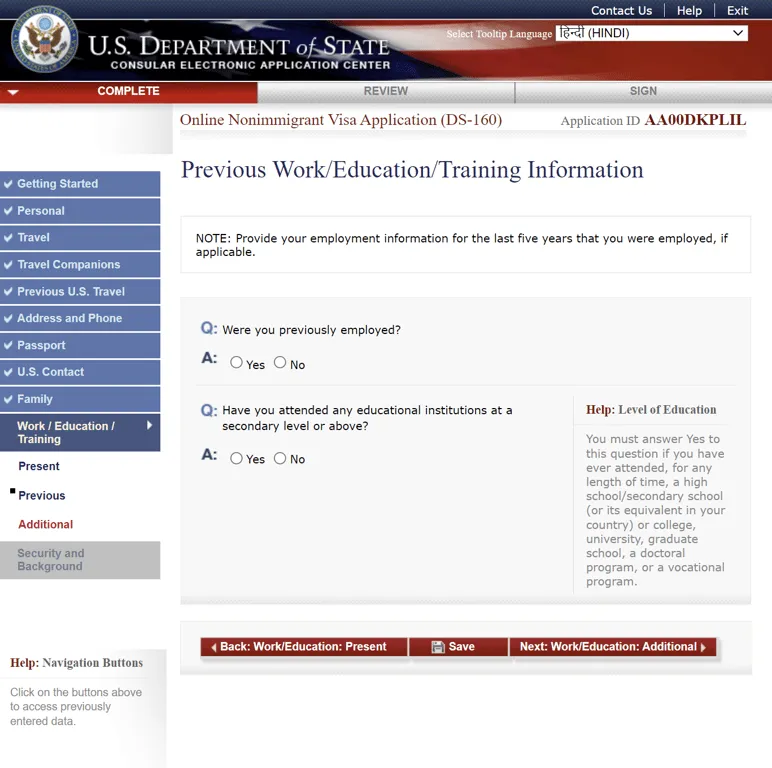
Step 14: Prior Work History/Education/Training
Prior Employment: Indicate whether you have held previous employment. If affirmative, provide comprehensive details concerning the relevant company. Detailing your prior employment history assists the consulate in assessing your professional development and overall job stability.
Additional Education: Specify any further educational institutions attended, and, if applicable, furnish comprehensive information pertaining to these studies.
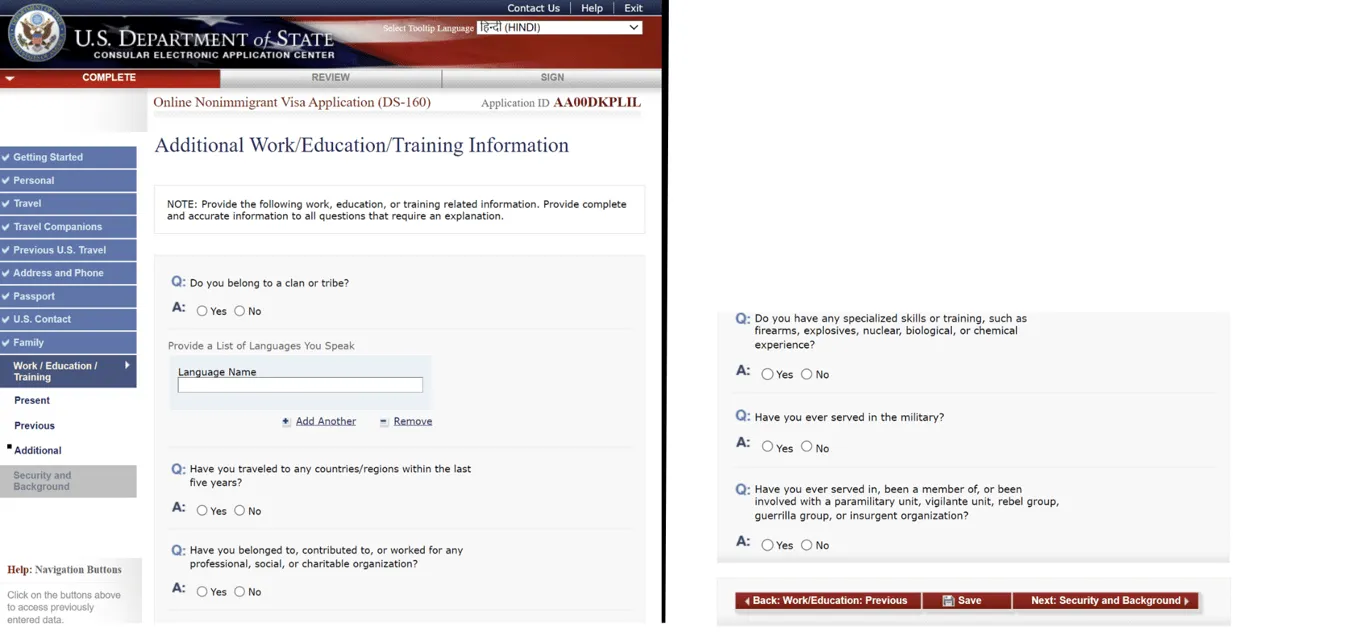
Step 15: Supplemental Work and Training Details
Congratulations on completing this stage of the application process! Subsequent questions will require a straightforward “yes” or “no” response. If you answer “yes,” you must furnish supplementary information.
Clan or Tribe Affiliation: Indicate whether you are associated with a clan, tribe, cult, or related group with a “yes” or “no” answer.
Language Proficiency: List all languages you are proficient in, encompassing all languages you can communicate within, reflecting potential cultural adaptability or specialized skills.
Travel History: Detail any countries visited within the past five years. This information provides authorities with valuable insights into your international travel patterns.
Organizational Participation: Respond with a “yes” or “no” answer regarding your involvement in professional, social, or charitable organizations, reflecting your social and professional engagements.
Specialized Skill Assessment: Indicate whether you possess specialized skills or training in areas such as firearms, chemicals, or related fields.
Military Service Record: Provide relevant details if you have served in the military. A high military rank may be considered during the application review.
Paramilitary Group Association: Specify whether you have ever been involved with, or are a member of, paramilitary, vigilante, rebel, guerrilla, or insurgent organizations, answering with a “yes” or “no” response.
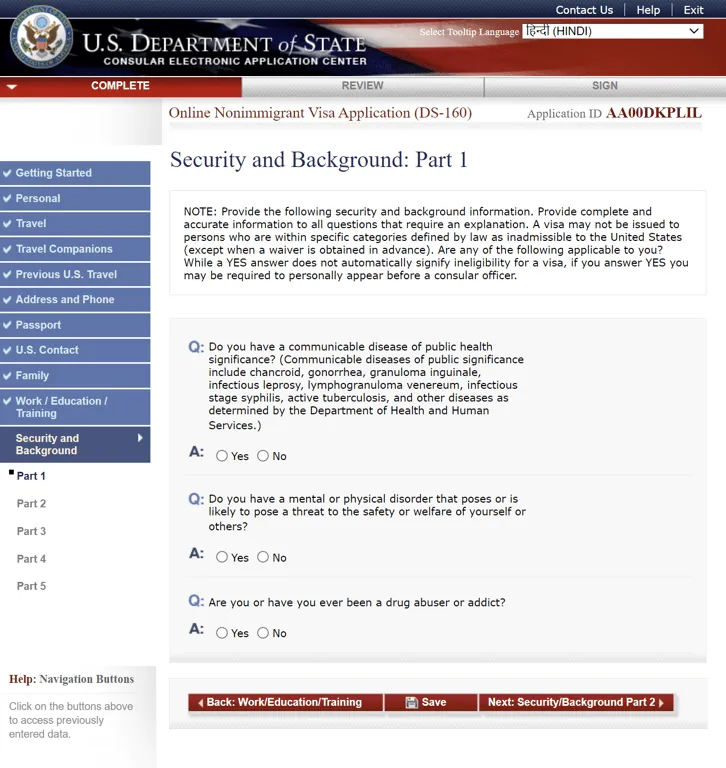
Step 16: Security and Background: Part 1
Medical Condition Disclosure: Disclose any serious medical conditions. This information is essential for determining potential risks or dangers you may pose to yourself, US citizens, or the public during your stay.
Mental or Physical Disorders: Respond with a ‘yes’ or ‘no’ if you have any mental or physical disorders that could present a threat to your safety or the safety of others. This question is critical for maintaining public safety and well-being.
Substance Use History: Detail any past or current use of illicit substances. A history of substance abuse may impact eligibility for a visa.
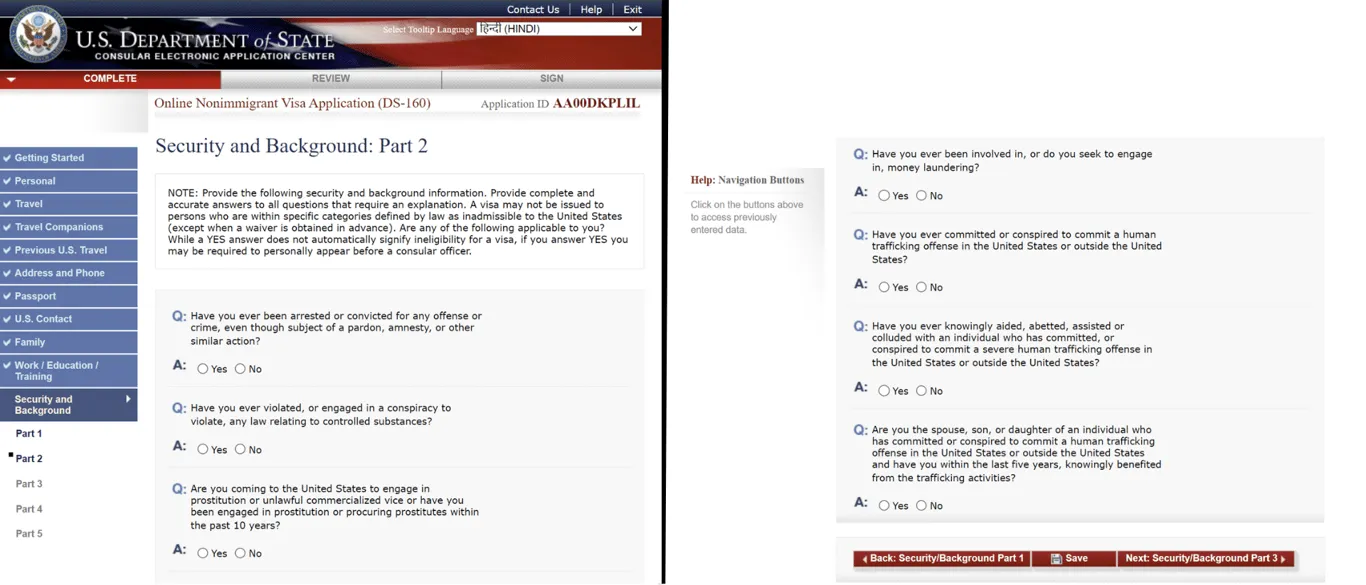
Step 17: Security and Background: Part 2
Criminal History: Disclose any prior arrests. Although a criminal record does not automatically preclude US visa issuance, supplemental documentation may be required.
Controlled Substance Violations: Specify if any violations of laws concerning controlled substances have occurred.
Prostitution and Commercialized Vice: Disclose any past or present involvement in prostitution or other commercialized vice activities.
Money Laundering Activities: State whether any money laundering activities have been undertaken or are intended to be undertaken.
Human Trafficking Involvement: Indicate any prior or current involvement with human trafficking.
Relationship to a Human Trafficking Victim: Disclose if you are the son, daughter, or spouse of an individual involved in human trafficking.
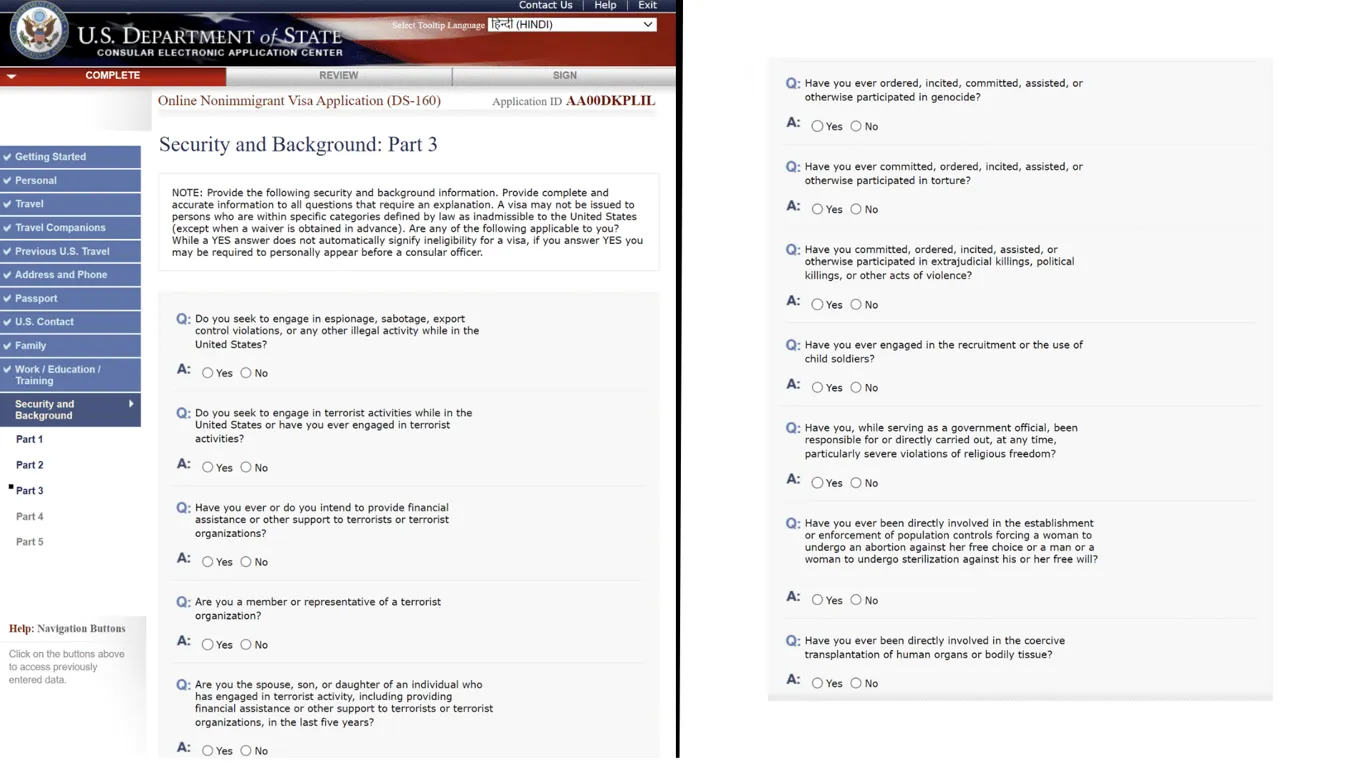
Step 18: Security and Background – Part 3
Espionage and Illegal Activities: You must disclose any intent to engage in espionage, sabotage, violations of export control regulations, or any other illicit activities within the United States.
Terrorist Activities: Disclose any intention to participate in terrorist activities during your stay in the United States, or if you have previously been involved in such activities.
Support for Terrorism: Declare whether you have, or intend to, provide financial assistance or other support to terrorist groups or organizations.
Membership in Terrorist Organizations: Specify if you are a member or representative of any terrorist organization.
Family Involvement in Terrorism: If you are the spouse, son, or daughter of an individual who has engaged in terrorist activities (including providing support) within the past five years, this must be disclosed.
Genocide Involvement: You must declare any involvement in genocide, including ordering, inciting, committing, assisting, or otherwise participating in such acts.
Torture Involvement: Disclose any involvement in torture, including ordering, inciting, assisting, or participating in such activities.
Violence Involvement: Declare any involvement in extrajudicial killings, political violence, or other violent acts.
Recruitment or Use of Child Soldiers: Disclose any involvement in the recruitment or use of child soldiers.
Violations of Religious Freedom: If you served as a government official and were responsible for or directly carried out particularly severe violations of religious freedom, this must be disclosed.
Population Control Enforcement: You must declare any direct involvement in the establishment or enforcement of population control measures, such as forced abortions or sterilizations conducted against an individual’s free will.
Coercive Transplantation Involvement: Disclose any direct involvement in the coercive transplantation of human organs or bodily tissue.
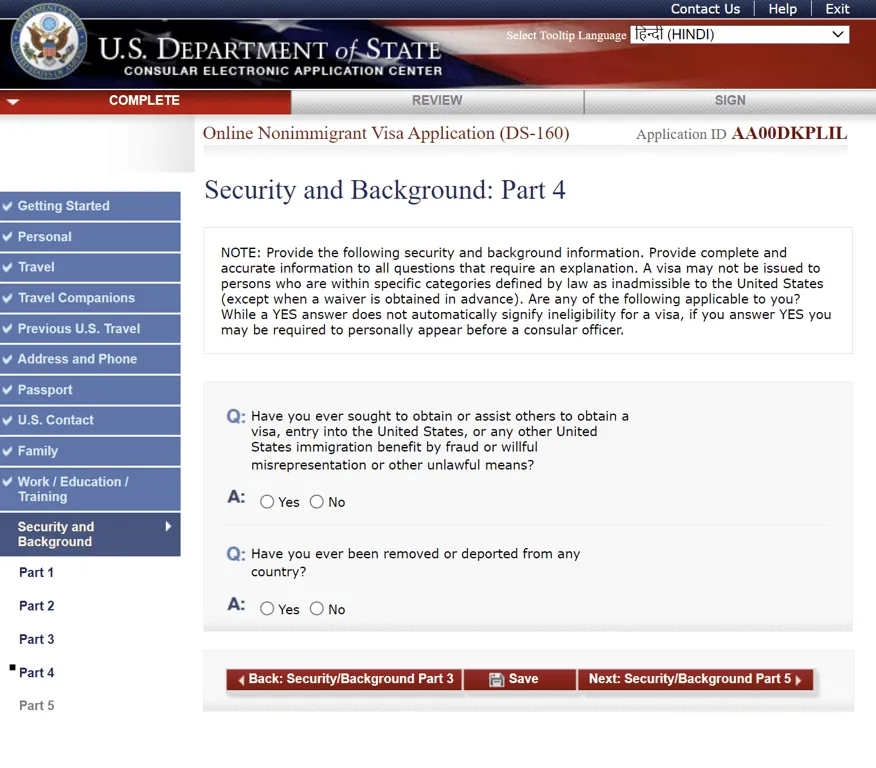
Step 19: Security and Background: Part 4
Immigration Fraud or Misrepresentation: Provide information regarding any instances where you have attempted to obtain or facilitated the acquisition of a visa, entry into the United States, or any other U.S. immigration benefit through fraudulent means, willful misrepresentation, or any other unlawful activity.
Removal or Deportation: Disclose any prior instances of removal or deportation from any country.
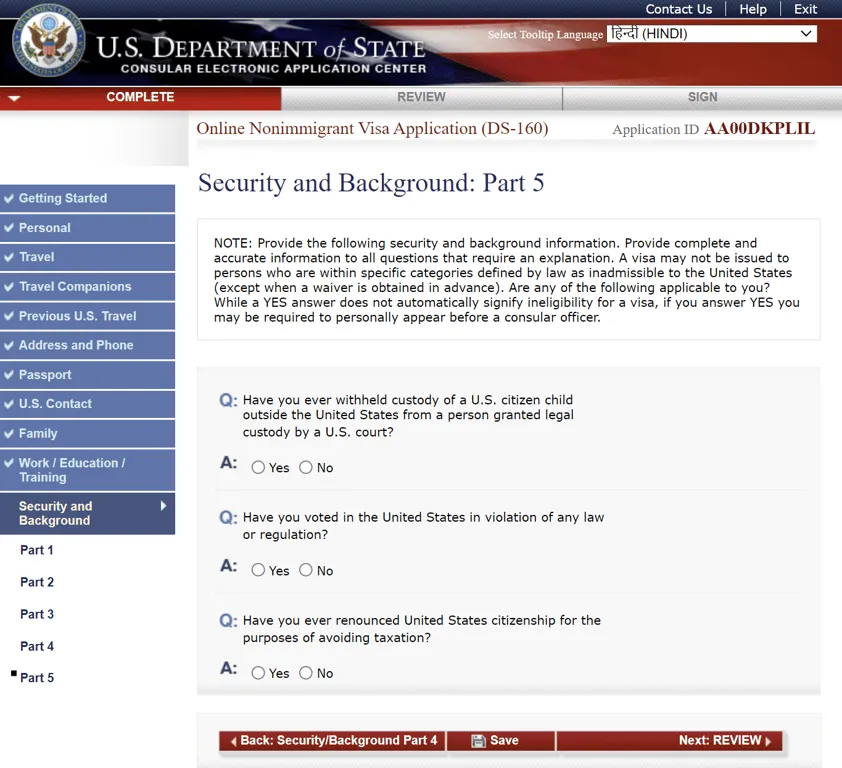
Step 20: Security and background: part 5
Custody of a US citizen child: Indicate if you have ever withheld custody of a US citizen child outside the United States from a person granted legal custody by a US court.
Illegal voting: Indicate if you have voted in the United States in violation of any law or regulation.
Renouncing citizenship to avoid taxation: Indicate if you have ever renounced United States citizenship for the purposes of avoiding taxation.
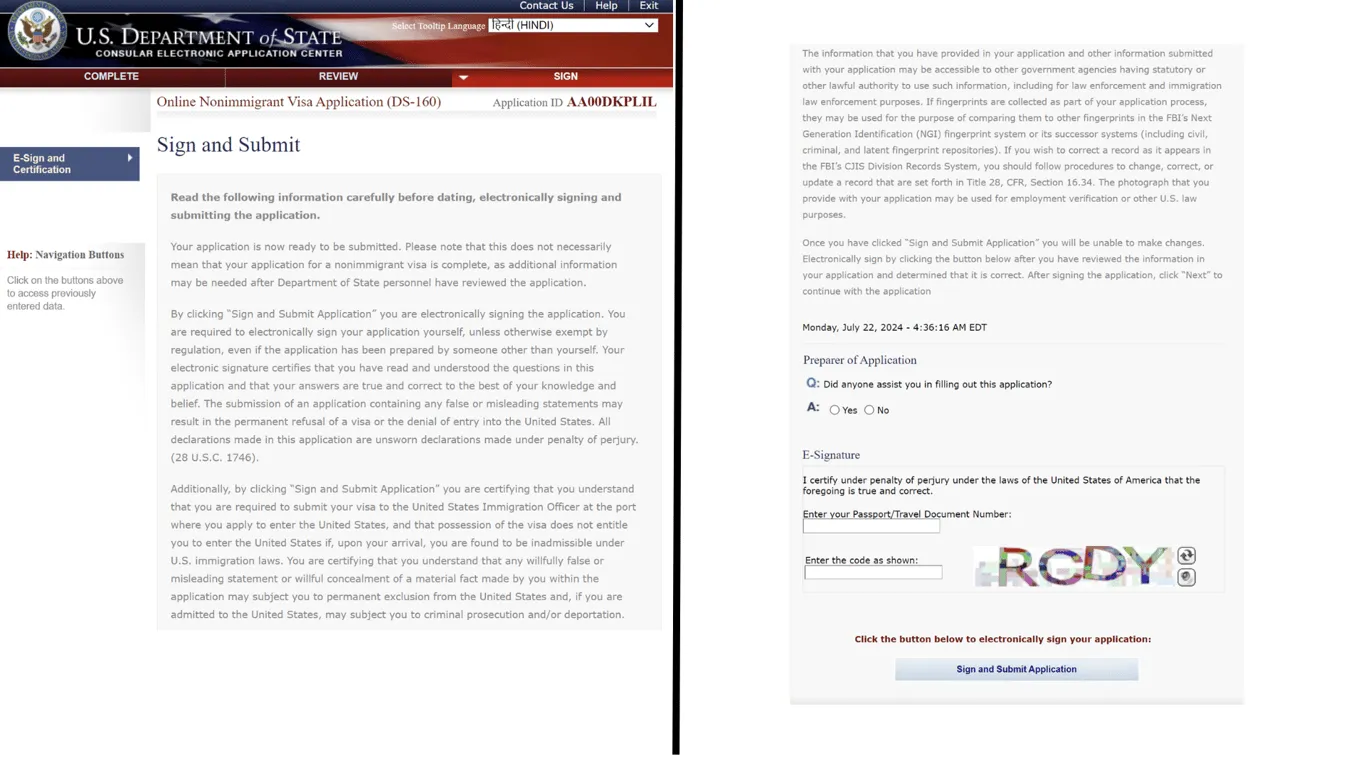
Step 21: Review, sign, and submit
Review your information: Go through the next pages and review all the information you have provided. Double-check each point to ensure accuracy and avoid visa rejection.
Sign and submit: Carefully read the provided information, and finally, digitally sign and submit your application.
Print confirmation page: Print the DS-160 confirmation page with the barcode, which you will need for your visa interview.
Potential Errors in DS-160 Form Completion
Submitting the DS-160 form accurately is crucial, as errors can cause processing delays or issues. Below are frequently observed mistakes made by applicants:
Failure to Complete All Fields: It is essential to populate every field completely and accurately, aligning information with data on your passport, employment records, and travel documents.
Discrepancies in Travel Dates and Plans: To prevent inconsistencies, meticulously confirm that your stated travel dates and purpose align precisely with your itinerary and any prior visa applications.
Neglecting the Review Stage: Prior to final submission, thoroughly examine all responses to identify and rectify any typographical errors or inaccurate data.
Use of Outdated Employment or Residential Information: Provide your most current employment details and address to avoid potential conflicts with supporting documentation.
Inaccurate Passport Details: Verify your passport number and expiration date with absolute precision, mirroring the information on your passport document.
Failure to Obtain the Confirmation Page: Upon submission, retain and print the confirmation page, as it is a required document for your visa interview.
Misinterpretation of ‘Yes’ or ‘No’ Questions: Carefully read each question to ensure correct responses, specifically regarding travel history and legal status inquiries.
Conclusion:
Successfully completing the DS-160 form is a vital stage in your United States visa application. Accurate completion of this form significantly impacts the likelihood of a positive outcome. Utilizing our detailed guidance will assist you in navigating this process effectively, thereby reducing the potential for delays or denials.
A successful visa application hinges on meticulous preparation and precise information submission. Dedicate sufficient time to thoroughly examine each section of the form, verify the accuracy of all details, and maintain organized records. This level of diligence streamlines the application process and improves the probability of approval.
Throughout this process, it is imperative to acknowledge that even seemingly minor inaccuracies can have substantial consequences. Proceed with careful attention to detail, and you will substantially enhance your prospects of obtaining a United States visa.
Our Commitment to Accuracy
This blog post provides guidance on completing the DS-160 form for your U.S. visa application. Please note that for the most current and precise details, it is essential to refer to the official U.S. Department of State website: CEAC website.
Frequently Asked Questions
What is the validity period of the DS-160 form?
The DS-160 application remains valid until your visa interview; however, it must be completed within 30 days days of initiation. Following submission, the data recorded in the form is retained for a period of one year, allowing for modifications to be made prior to your scheduled interview.
Is submitting the completed DS-160 form required before my visa appointment?
No, the consular officer will review the information entered in your DS-160 form electronically. Nonetheless, a printed copy of the DS-160 confirmation page is necessary for submission during your appointment.
Can I reprint the confirmation page if I lost my previous one?
Yes, you can reprint the DS-160 confirmation page by accessing your application online. Using your security question and application ID, you can retrieve your confirmation page and reprint it.
Is it permissible to respond to DS-160 questions in my native language?
No, completion of the DS-160 form requires responses in English. The only exception is for the input of your name and address if these are represented using non-English characters.
Who must fill out the DS-160 form?
The DS-160 form is required for all nonimmigrant visa applicants to the US, including those applying for:
Tourist visas (B2).
Business visas (B1).
Student visas (F and M).
Exchange visitor visas (J).
Crewmember and transit visas (C1/D).
H1B visas (temporary employment in speciality occupations).
K1 visas (fiancé(e) visas for foreign nationals engaged to US citizens).
F1 visas (student visas for academic study in the US).
Recent Blogs
- Easiest schengen countries to get visa from
- E-visa vs regular visa
- H4 Visa Interview Questions
- B1/B2 Interview Questions and Answers
- Visa On Arrival Countries For Indian Citizens
- Visa Free Countries For Indian Passport Holders
- B1 B2 Interview Preparations
- H1B Visa Interview Questions & Answers
- K1 Visa Interview Questions
- F1 Visa Interview Questions & Answers
- Schengen Visa Country of First Entry
- J1 Visa Interview Preparation